Page 3 of 4 FirstFirst 1234 LastLast
Results 41 to 60 of 66

Thread: Lil Red - Duramax 6600/Allison Conversion/Swap & OBS/NBS Dash Conversion

  1. #41
    Join Date
    Feb 2000
    Location
    Montana
    Posts
    11,484

    Thumbs up The "Look"... Update 2/5/2024

    I watched a couple of pickup truck related events on Youtube recently. The first photo here was screenshot from the 2023 Hot Rod Powertour video while the tour was in eastern Tennessee and the other was from a video about a Chevy C10 group event that was sponsored by LMC Trucks. I saw a couple of trucks while watching the videos that made me hit the rewind button....


    Though Lil Red is now 35 years old (but 20 years in its present form), it seems some of the design elements may have appealed to a couple of other truck builders. I think its cool.

    Jim
    Last edited by More Power; 02-05-2024 at 12:46.

  2. #42
    Join Date
    Jan 2001
    Location
    New Hampshire - Live Free or Die
    Posts
    6,084

    Default

    Oh, those wheels!
    The Constitution needs to be re-read, not re-written!

    If you can't handle Dr. Seuss, how will you handle real life?

    Current oil burners: MB GLK250 BlueTEC, John Deere X758
    New ride: MB GLS450 - most stately
    Gone but not forgotten: '87 F350 7.3, '93 C2500 6.5, '95 K2500 6.5, '06 K2500HD 6.6, '90 MB 350SDL, Kubota 7510

  3. #43
    Join Date
    Feb 2000
    Location
    Montana
    Posts
    11,484

  4. #44
    Join Date
    Feb 2000
    Location
    Montana
    Posts
    11,484

    Post Update - 2/28/2024 - Purple Power!


    The power increases eventually reached the limits of the factory Allison. In working with Kennedy and ATS, we came to the conclusion that the "ATS Extreme" Allison would be a step in the right direction. It has been. While the original factory Allison could be made to slip with 500-hp and a power-brake launch at the strip, the ATS has yet to slip, even with more than 600 hp. The torque converter contains a 5-disk pack that provides for a solid connection once locked.


    A note about this image... Originally, I used smoke-tinted covers for both the headlight lenses and turn signal lenses. I would then remove the smoke tinted headlight covers if/when the truck was driven in the evening or at night (very rarely). The covers were employed only during during the daylight hours. Because removing/replacing the covers was a royal PITA, I have since replaced the tinted covers with DOT tinted headlight lenses and tinted turn signal lenses. I did give up a small amount of illumination in exchange for a better match for my patience.

    A local friend who also just happens to own a mechanics garage (and is a transmission expert), worked with me to install the new ATS Allison. The lift makes this sort of thing so easy, when compared to a transmission floor jack and jack stands...

    Shift quality while using performance programming was pretty "performance oriented", sometimes producing a little "bark" from the rear tires at gear changes while on local highways. Who can resist using a little pedal? But, when toning down the ECM programming to near stock levels, the ATS Allison gets real close to factory Allison shift quality.

    I've not had any code setting with this transmission - or any other problem. There's only about 12K miles on it since installation, and the ATF fluid remains nice. The transmission has seen only a couple of dozen 1/4-mile runs and a similar number of dyno runs so far, plus highway driving. But, I do plan to service the transmission this coming spring - new spin-on filter and pan filter, plus a fluid drain/refill. I'll report back once that's been completed... if we find anything unusual. Jim
    Last edited by More Power; 03-25-2024 at 18:23.

  5. #45
    Join Date
    Jan 2001
    Location
    Knoxville,Tennessee
    Posts
    2,680

    Default

    Are you running Kennedy's tune on your truck? Or a custom version of his?
    "The Constitution is not an instrument for the government to restrain the people, it is an instrument for the people to restrain the government."
    -Patrick Henry


    A5150nut
    2006 K3500 D/A
    94 6.5 4x4 5spd Sold

  6. #46
    Join Date
    Feb 2000
    Location
    Montana
    Posts
    11,484

    Default

    Quote Originally Posted by a5150nut View Post
    Are you running Kennedy's tune on your truck? Or a custom version of his?
    Currently, the truck has a Kennedy EFI-Live switch-selectable tune - a stock power setting with fuel economy, and a +100 hp setting. Time flies, but this programming was added not all that long ago. Jim
    Last edited by More Power; 04-03-2024 at 10:09.

  7. #47
    Join Date
    Jan 2001
    Location
    Knoxville,Tennessee
    Posts
    2,680

    Default

    How street-able is the 100 hp setting?
    "The Constitution is not an instrument for the government to restrain the people, it is an instrument for the people to restrain the government."
    -Patrick Henry


    A5150nut
    2006 K3500 D/A
    94 6.5 4x4 5spd Sold

  8. #48
    Join Date
    Feb 2000
    Location
    Montana
    Posts
    11,484

    Default

    Quote Originally Posted by a5150nut View Post
    How street-able is the 100 hp setting?
    Haven't used it enough to form an opinion. It definitely brings a bit more "sport" to the table than the stock setting. It would be interesting to compare the two current power settings on the dyno. I do know that the race programming from before was a bit too sporty for the street - that is, once I got past the "watch this" phase.
    Last edited by More Power; 04-03-2024 at 10:10.

  9. #49
    Join Date
    Jan 2001
    Location
    Knoxville,Tennessee
    Posts
    2,680

    Default

    I was curious about the 100hp been thinking it might be on my bucket list
    I'm sure John removes the speed cap too. My son had a 6.0 built and we were on the way to Winimucka from Carlin NV he dropped back about 5 truck lengths and nailed it. When he got up to me I nailed mine. matched his speed, then started pulling away. Up till I hit 94 and the computer started de-fueling my foot
    "The Constitution is not an instrument for the government to restrain the people, it is an instrument for the people to restrain the government."
    -Patrick Henry


    A5150nut
    2006 K3500 D/A
    94 6.5 4x4 5spd Sold

  10. #50
    Join Date
    Feb 2000
    Location
    Montana
    Posts
    11,484

    Default

    Quote Originally Posted by a5150nut View Post
    I was curious about the 100hp been thinking it might be on my bucket list
    I'm sure John removes the speed cap too. My son had a 6.0 built and we were on the way to Winimucka from Carlin NV he dropped back about 5 truck lengths and nailed it. When he got up to me I nailed mine. matched his speed, then started pulling away. Up till I hit 94 and the computer started de-fueling my foot
    I haven't pushed things too far with the latest programming. I seem to remember talking with John about the engine rpm and vehicle speed limit settings. I asked for 4000-rpm as the programmed max engine speed, and we talked about removing any sort of programmed vehicle speed limiter. So, with an engine rpm limit currently at 4k, and with 2000-rpm currently producing 80-mph, the theoretical vehicle speed limit is.... a little scary. I've not tested the theoretical. I heard once that "there are old pilots and there are bold pilots. But, there are no old-bold pilots."
    Last edited by More Power; 03-15-2024 at 11:30.

  11. #51
    Join Date
    Feb 2000
    Location
    Montana
    Posts
    11,484

    Talking Update 3-21-2024 - Diesel Performance!

    This video was produced some years ago, before diesel performance programming could produce power without smoke and while tires were a bit less expensive than they are now. Mind you, something similar to what's shown here can be seen today on nearly any performance automotive cable program or related Youtube channel. So... Lil Red hasn't produced smoke in years and tires are currently viewed as a more longer term investment...


    Except for imagining vvrrrooommm sounds, there is no audio. However, no pedestrians or cute bunnies were harmed in the making of this film.

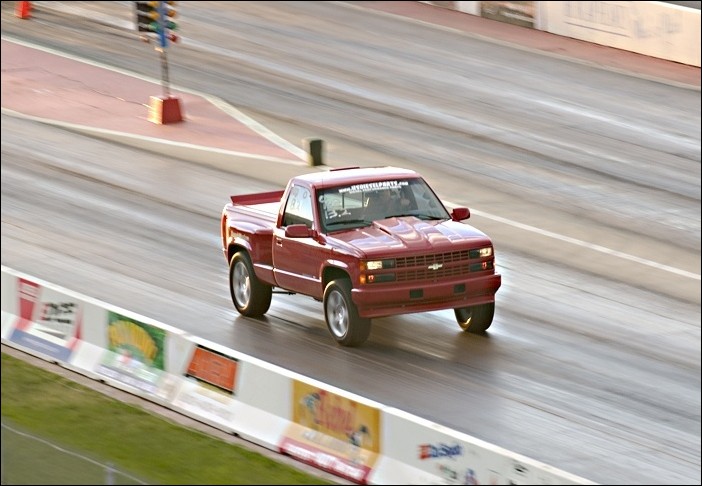
    The following image was shot a few months after the above video was taken, only this time I was using a KennedyDiesel.com EFI-Live program that allowed the truck to dyno 500-rwhp. As you can see, there is no visible smoke shown here at the beginning of a 1/4-mile run.

    I was likely using a Van-Aaken performance module when the smokey burnout video was made. I liked that in-line module when used at lower power (no smoke) settings, and I used it for years in my 2001 GMC Duramax crew cab where it could smoothly produce more than 400 rwhp without smoke.


    Back in the early days of the Duramax I answered a few emails from young guys who wanted ideas for how to get their truck to produce more smoke... I tried to discourage the idea...
    Last edited by More Power; 04-03-2024 at 10:13.

  12. #52
    Join Date
    Feb 2000
    Location
    Montana
    Posts
    11,484

    Post 4/1/2024 Update - Checklists

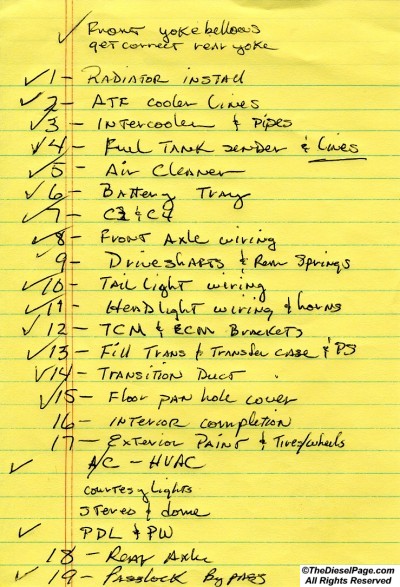
    When beginning a project as complex as a Duramax conversion, it's helpful as you work through the project to use checklists, and then concentrate on one or just a few steps at a time. A person can become bogged-down and discouraged when contemplating the entirety of the project. Again, just concentrating on a few steps at a time helps to keep you focused, and allows you to see and measure progress in real terms.

    When Lil Red was still in the planning stages, and later while actually working through the conversion, I created many lists that I used to help keep me focused. Shown below is just one of those lists (yes, I kept them all). Some of the lists, notes and hand-drawn diagrams were later refined and then included the "Duramax Conversion Guide". Aside from helping me as the conversion was taking shape, some of this information could be helpful if a problem appears months/years later. Knowing the details can aid in troubleshooting.


    When taken as bite-size chunks, the project becomes more doable for most people. And a list helps to keep you focused....

    Jim

  13. #53
    Join Date
    Feb 2000
    Location
    Montana
    Posts
    11,484

    Post 4/2/2024 - More Magazine Coverage

    Here's an article I wrote for the 2007 issue of Diesel World magazine (involving Lil Red), which wraps up a discussion we were having at the time about Duramax Diesel performance - performance that didn't require tons of money, was relatively easy to do and didn't involve a lot of modification. The actual dyno performance data is included here too.


    Let me know if you have any questions.
    Jim Bigley
    Last edited by More Power; 04-03-2024 at 08:55.

  14. #54
    Join Date
    Feb 2000
    Location
    Montana
    Posts
    11,484

    Post 4/16/2024 Update - An Early Track Day

    Early in Lil Red's history we visited a number of tracks here in the Northwest, from Salt Lake to Abbotsford, BC. The following photo was taken at the Spokane Raceway in (I think) mid summer 2005. That day was more of a shake-down, experimenting with different products as well as trying to find the best way to launch the truck (2WD, 4WD, powerbrake light/hard...). 2WD didn't work well at all... And, I didn't have nitrous on it then. This early period was still pre EFI-Live, and the truck was still running with the original Allison, so the day turned out to be more about learning how to run the truck rather than make any real progress in performance. However, it was still a super fun day and I was able to see how well the truck/Duramax performed when closer to stock power. Plus, I got to spend time with my son and talk to other enthusiasts at the track.

    Last edited by More Power; 05-02-2024 at 10:52.

  15. #55
    Join Date
    Feb 2000
    Location
    Montana
    Posts
    11,484

    Post Update - Rear Disc Brakes


    Rear Disc Brake Conversion
    -
    for GM's 9-1/2" 14-bolt Semi-Float Rear Axle
    Part I -
    From the archive - an in-depth look at the rear disc brake conversion used in Lil Red

    The new GM 9-½" semi-float rear axle has been installed, and to improve braking ability, we've decided to upgrade to disc brakes. Rear discs help with two important areas - the reduce un-sprung weight and they increase stopping ability. Demands on the braking system increase as vehicle speeds increase. Stopping can be more important than going fast.

    All of the brake components used in this conversion are factory GM 1999-2003 model-year K1500 parts bought from either a local GMC dealer or from Spalding Auto Parts in Spokane, WA. The only special items not available from GM are the adapters needed to adapt the original axle flanges to the new disc brake backing plates.

    The above photo shows a complete set of parts for one side - rotors, assembled backing plate, caliper, caliper mounting bracket, flex hose and related hardware. Not shown is the backing plate adapter and related bolts. We hope to have the newly fabricated flange adapters ready for part II of this article.


    The factory cast-iron vented rotors shown here are about $60 each and are designated for a "Pickup JC5/JH5 - Vacuum" braking system, having a nominal diameter of 325-mm x 20-mm thick (12.8 x .787"). Inside each rotor is a parking brake mini-drum.

    Note: You may need to reduce the outside diameter of the axle wheel flange to allow the axle flange to fit flush within the inside face of the rotor. I used an angle grinder with the truck's engine idling in drive. Both rear wheels/tires were off the truck, and the rear axle was supported by a pair of jack stands. I used an 8x16" concrete block to steady the angle grinder - to get a near perfect reduction in outside diameter of the axle flange. It only needed a very small amount of reduction.


    The disc brake backing plate assembly (pn-15206075) came as a fully assembled piece, with the parking brake components already installed. The parking brake shoe is a one-piece affair, with cable actuated and adjustable shoe engagement, to compensate for fit and wear over time.


    The above shows the rough working drawing used to fabricate the axle flange adapters. The dimensions shown here will exactly center the brake caliper over the brake rotor.

    The square plates for each adapter are the same size, but are clocked differently to correctly locate the brake calipers at the front - when viewing both left and right sides. The points of the square end-plate that bolts to each disc brake backing plate are positioned at 12 & 6 o'clock. The square end that bolts to the existing axle flange (welded to the axle housing) should be positioned 5° nose down for both the right and left side of the truck. This means that the adapters for both the right and left sides of the axle are different from one another.

    See Part II below...

    Jim


    Last edited by More Power; 05-12-2024 at 11:17.

  16. #56
    Join Date
    Feb 2000
    Location
    Montana
    Posts
    11,484

    Post Rear Disc Brake Upgrade - Part II


    Disc Brake Upgrade - Part II
    A
    rear disc conversion generally offers better braking ability - both when dry and especially when wet, weighs less than most drum brakes, sheds heat faster - more fade resistant, and discs just look way cooler... Our rear disc brake installation is now complete. Read on to find out how they look and stop.

    Note: I spray painted the outward facing areas of both rotors (except for the rotor surfaces that make contact with the brake pads) using a high-temp silver automotive paint. The rotors are made using a rust-able cast iron. The silver paint keeps things looking good.

    We converted to rear disc brakes primarily because we had upgraded to a stronger rear axle, were using a larger tire/wheel combination, and we needed better rear braking than was provided by the original rear drums. The sum of the new rear disc brake components provided no weight savings when compared to the small 10" drums used on the original 10-bolt rear axle, but in addition to the coolness factor, the rear braking ability has definitely improved - more about that later.

    There are a number of companies that offer disc brake conversion kits for 1500/2500/3500 series GM pickup trucks and SUV's currently equipped with rear drums (see list at end of article). A DIY project like this, when using all new GM parts + fabrication, will cost about the same as a commercial kit. I chose to use all new OEM parts for ease of maintenance and when buying future replacement parts. Plus, a functional and effective emergency brake was necessary because this truck will be trailered occasionally. The e-brakes included with most aftermarket disc brake kits I've seen don't inspire a lot of confidence.


    Fabricating the offset brackets was the most time consuming portion of the project. I had a local fab shop build these for me, using a drawing I supplied. The ½" steel end plates were cut from sheet using a water jet CNC, and a section of steel pipe was located that fit the OD of the axle tubing.

    Once back from the fab shop, I spent some time drilling and tapping the sixteen holes for the 12mm bolts, then squirted on a little black paint.

    It should be noted that the dimensions listed on the drawing fit the 1997 model-year 9-½" 14-bolt semi-float axle used in our buildup. If you are installing similar disc brake components on the smaller GM 10-bolt rear axle, you may need to adjust the thickness of the offset brackets to compensate for a different axle flange location. Flange offset bracket thickness is correct when the rotors are centered in the assembled disc brake pad brackets.


    The newly fabricated offset bracket has been bolted onto the axle flange using four 12mm bolts, each torqued to 100 ft/lbs using thread locker. Correctly clocking the square ends was important to transfer the correct orientation to the disc brake backing plate.

    I drilled out the threaded holes in the original axle flange (using a ½" bit) to allow the 12mm bolts to pass through and then thread into the new brackets.

    This bolt-on installation has proven to be plenty secure. A lot depends on the quality of the welds. I had a pro do the welding for me.


    The disc brake backing plate has been bolted on using four 12mm bolts, each torqued to 100 ft/lbs using thread locker. The calipers and disc pad brackets are bolted onto the forward-facing side of the backing plate, 9 o'clock on the driver's side and 3 o'clock on the passenger side (passenger side shown).

    The axle shafts need to be removed when installing the offset brackets and disc brake backing plates. It's a fairly simple job to remove the differential carrier pin, slide the axle toward the center, then remove the axle-retaining C-clip. The axle will then slide out. Be a little careful not to damage the wheel bearing seal.


    The original steel hydraulic brake lines were carefully reshaped by hand to fit the disc brake flex-line mounts. The truck's original e-brake cables can't be modified to work with these GM disc brakes due to the new rear facing e-brake cable anchor (1) and actuation lever (2).


    To match the new disc brakes, you'll need a set of e-brake cables made for a similar wheelbase 1500 series truck (i.e. 2000 model-year, models 03, 06, 53 - new style 4x4). These loop over/under the axle, then sweep around to make the connection on each side.

    The above driver's side photo shows the e-brake cable sweeping around and anchoring to the shock mount, then running under the axle tube, before sweeping up and through the wire loop bolted to the frame.


    On the passenger side, the e-brake attaches to the rear facing side of the brake backing plate, loops away and then is anchored to the axle tube, before sweeping up and over the pumpkin. The cable mount shown in this photo that secures the cable to the axle tube is simply a steel strap, but you can weld on a tab if you have access to the right fabrication equipment.

    A metal clamp secures the e-brake cable from one bolt on the differential cover. From there, the cables sweep across and forward through the wire loop on the frame.


    The forward ends of both e-brake cables mount to a fabricated bracket that is bolted to the frame. I may tinker with it a bit over the next few months.

    A 2" long piece of ½" square steel tubing was used to provide an anchor point for both cables that can rotate slightly to accommodate a slight misadjustment between the right & left e-brake shoes. This is similar to how the factory parts operate.

    Articles have appeared in various truck magazines that mentioned a few potential complications when converting from drums to discs. First, some recommend a new brake master cylinder designed for a 4-wheel disc system, to either provide more fluid volume for the larger rear disc brake caliper pistons or to modify hydraulic brake pressure. Secondarily, they mention that the front/rear brake proportioning valve may need to be modified or replaced for some installations. I had installed a new brake master cylinder and hydraulic brake booster when the truck was assembled a year ago, and I did not want to buy replacements. After breaking-in the rear rotors/pads and performing a few hard stops, I feel that (for this particular truck and installation) a new master cylinder is not necessary, nor is replacing/modifying the proportioning valve. The current front/rear brake proportioning appears to be nearly ideal for this lightweight truck.

    I lucked out, but some of the factors that contribute to correct brake proportioning include the weight of the vehicle - especially over the rear, condition of the brake master cylinder and hydraulic brake booster, wheel & tire combination and type/composition of the disc brake pads themselves (some are more aggressive than others). I installed the NAPA Premium Disc Brake Pads #AE-7662-M, which are asbestos-free and are supplied with new anti-rattle clips.

    An alternative to retrofitting discs to your existing rear axle would be to locate a suitable disc brake equipped rear axle that had been installed in a newer vehicle. If you can locate a replacement disc brake equipped rear axle in good shape and with the correct gearing, your total cost could be somewhere in the same general price range as a rear disc brake conversion kit. I considered going that route, but unfortunately, GM didn't produce a six-lug disc brake equipped rear axle with the 9-½" ring & pinion that I needed (all current GM disc brake equipped 9-½" rear axles now have 8-lugs, and are used on GM's light-duty ¾-ton trucks).

    If you have a drum brake equipped heavy-duty ¾-ton or 1-ton truck, you'll find a variety of aftermarket disc brake upgrade kits currently available for your rear axle. In addition to the braking advantage, disc brakes would provide a worthwhile weight savings due to the much larger drums used on the HD vehicles. Incidentally, if you maintained the functionality of the RWAL (Rear Wheel Anti-Lock) braking system for your conversion, this disc brake conversion won't affect the performance of the anti-lock system. This is because the RWAL uses the vehicle speed sensor to determine whether the rear wheels are rotating during a hard brake application. There are no individual rear wheel speed sensors used by the truck's original braking system.

    Would I do it again on a ½-ton? Tough call, but I would if there was a need improved braking performance or simply wanted more modern disc brakes on the rear axle. Appearance is important too... They do look cool! TDP


    Continued next post...

    Last edited by More Power; 05-12-2024 at 11:22.

  17. #57
    Join Date
    Feb 2000
    Location
    Montana
    Posts
    11,484

    Post


    1999-03 Pickup JC5/JH5 K1500 OEM Six-Lug Rear Disc Brake Components:


    • These parts fit models 03, 06, 53 - new style 4x4
    • Aluminum Single Piston Caliper Right: #18040088 List $188.02 Discount $131.61
    • Aluminum Single Piston Caliper Left: #18040087 List $193.42 Discount $135.39
    • Brake backing plate: #15206075 $54.25 ea (2 required)
    • Brake Pad Guide bracket: #18040090 $59.25 ea (2 required)
    • Brake Flex-hose Right: #15102334 $24.26
    • Brake Flex-hose Left: #15102333 $24.26
    • Caliper Guide pin: #12530697 $4.40 ea (4 required)
    • Caliper Guide pin grease seal boot: #12530703 $3.68 ea (4 required)
    • Bolts: #15007007 $2.85 ea (16 required)
    • Bolts: #15012506 $0.99 ea (4 required)
    • E-brake Cable Left: #15084208 $22.00
    • E-brake Cable Right: #15084209 $29.83
    • The new factory cast-iron vented rotors shown here were about $60 each and are designated for a "Pickup JC5/JH5 - Vacuum" braking system, having a nominal diameter of 325-mm x 20-mm thick (12.8" x .787"). These were purchased from Spalding Auto Parts in Spokane, WA - 800/366-2070 www.spaldingautoparts.com.

    GM pickup & SUV Aftermarket Disc Brake conversion sources:
    AP Racing (aka Brake Pros www.brake-pros.com)
    888/266-0696
    www.apracingusa.com

    Dynatrac
    714/596-4461
    www.dynatrac.com

    Stainless Steel Brakes Corporation
    716/759-8666
    www.ssbrakes.com

    Wilwood Disc Brakes
    805/388-1138
    www.wilwood.com

  18. #58
    Join Date
    Feb 2000
    Location
    Montana
    Posts
    11,484

    Thumbs up Update 4-30-2024 - Bling! New Tail Light Lenses

    It's been a long time since I polished the original tail light lenses on Lil Red. After polishing them the first time, they photographed well enough for the promotional photos I needed. They weren't perfect, but they were good enough, considering how much other stuff still needed to be done on the truck during that time. But that was then, and this is now - and the tail light lenses needed attention once again (see below). So.... instead of polishing them this time around, I thought I'd take the easy way out and just replace them.


    Yes, I could have polished the original lenses shown here on the left... yet again. I have the polish and the buffer, but the foam rubber gaskets that seal the lenses against the truck have deteriorated somewhat, and the foam perimeter gaskets are porous enough to hold grime and/or wax, which makes them tough to keep clean.

    Visually, one of the things I tend to notice about new vehicles is the shiny "jewel-like" faceted appearance of head/tail light lenses. New lenses just look... well... "new". Spiffy lenses improve the look of any truck.


    I've used this "Eagle Eyes" brand of lenses before - I have a set of headlight/park lenses on the shelf for my 2001 GMC. The quality is pretty good. The new tail light lenses shown here were made in Taiwan and are priced reasonably via Amazon Prime... a little over $50/pair delivered. Being the hoarder that I am, I'll likely hang onto the original lenses for a while longer.

    Jim
    Last edited by More Power; 06-10-2024 at 13:24.

  19. #59
    Join Date
    Feb 2000
    Location
    Montana
    Posts
    11,484

    Lightbulb Update 5/22/2024 - Lil Red's Duramax Conversion - Intercooler Details


    From the 2004 archive: These photos show the installation of a modified stock 1994-2002 Dodge intercooler - to give you some idea what the installation looks like in Lil Red. This Project Update will introduce you to the intercooler installation process, and illustrate some of the modifications necessary to install a 1994-2002 Dodge Cummins intercooler in a 1988-98 C/K pickup truck or Suburban.

    As it turns out, the Dodge Cummins intercooler core dimensions are exactly the same as the core used in a stock 2001-2004 GM Duramax powered 2500HD/3500 truck. At the time I put Lil Red together, I could not locate a used/salvaged GM intercooler, and was already over-budget on this project, so I wanted to cut costs where I could. A factory new GM intercooler was more than $600 at that time. So, the only reason I bought and modified a Dodge Cummins intercooler was because I was able to buy one on eBay for a lot less. A GM factory Duramax intercooler would have been my first choice otherwise, even though it too might need to be modified.


    The above photo shows what the modified Dodge intercooler looks like installed on the truck, but before the hood latch support had been modified.

    This intercooler was purchased from a seller on Ebay. I had been watching Dodge intercooler auctions for a few weeks, before deciding to actively engage in the buying process. Some of the offered intercoolers were removed from wrecked or damaged Dodge trucks, so you need to evaluate any intercooler offered to determine whether it remains usable or whether the damage was more cosmetic in nature. The one I bought did have some cosmetic issues, but was structurally sound and leak-free. Based on the auctions I monitored, you might expect to pay anywhere between $150 and $400 depending on condition for a usable Dodge Cummins intercooler and the whims of your bidding competitors.

    The Dodge IC core is approximately 15-3/8" tall, a couple of inches shorter than the available space in front of the radiator.

    The IC core is a little more than 2" thick, and will fit fairly well behind the hood latch support bracket in the space formerly occupied by the A/C condenser. The hood latch bracket must be modified to allow for a modified A/C condenser to fit ahead of the intercooler. I could show the A/C condenser mods in a future update if anyone would like to see how I solved that problem. Can't live without A/C...

    Aside from being 15-3/8" tall, the core is also 36" wide, not counting the bulk of the end tanks. A 36" wide core closely matches the radiator core width, and works well with the C/K OBS (Old Body Style) radiator core support. The total width, including the end tanks wound up being about 45-½".

    These photos show the mods I made to the aluminum end-tanks of the intercooler. As received, the Dodge intercooler's 3" inlet/outlet would need to penetrate the box-sectioned structural member on each side of the radiator core support. I decided not to weaken the radiator core support, which meant modifying the intercooler - i.e. moving the intercooler's inlet/outlet to be outside of the radiator core structural supports.

    Widening the intercooler end-tanks required adding material - I used 1/8" aluminum sheet material.

    Jim
    Last edited by More Power; 12-10-2024 at 13:41.

  20. #60
    Join Date
    Feb 2000
    Location
    Montana
    Posts
    11,484

    Lightbulb 5/23/2024 - Intercooler Details #2


    This image shows more detail about how the intercooler end-tanks were modified. The intercooler's inlet and outlet were moved outward to clear the boxed steel sections of the radiator core support, and then the end-tanks were modified to help provide more clearance for the head/park lamp assemblies. A 4" hole needs to be cut in the radiator core support where the intercooler's inlet/outlet pass through.

    I made all of the cuts/mods to the original intercooler, then took it and the various pieces to a metal shop for aluminum TIG welding. If doing this again I'd buy my own TIG welder and learn how to use it. In the end there would be no labor charges and I'd still have the TIG welder... all for about the same final cost. And incidentally, once all of the mods were completed I flushed water through the intercooler in each direction several times in an effort to remove any debris that might have collected internally during the process of modification.

    I used the GM factory intercooler hoses, clamps and aluminum tubing produced for a 2001 model year Chevy/GMC equipped with a Duramax 6600. If you have a donor vehicle that'll provide all this, you're golden. You don't have to use the original factory parts, but they will make it just a bit easier. The factory aluminum intercooler tubing will need to be extended because of the widening of the intercooler inlet/outlets. This is a relatively easy process. I used 3" aluminum agricultural sprinkler pipe to provide the extension material. I still have about ~8' of this pipe laying around... if anyone needs some. The Conversion Guide shows how/where to add the extensions.

    Of course, there are alternatives with regard to intercoolers. You could search for a generic intercooler core from an online source that suits your installation, then modify it as/if required. We did that very thing for a 6.5L diesel Suburban in a book published by The Diesel Page a few years ago... see link. At the time, the total cost, which included the core, all of the hoses, clamps and aluminum tubing cost about $400 total. So, you don't have to begin with a Dodge or GM intercooler. A generic intercooler core just needs to be sized for a diesel engine approximating the displacement of the Duramax, and of course fit into the available space.

    In addition, I know of at least one Duramax conversion running without an intercooler. An owner in Canada used our mounts and Conversion Guide, but chose to avoid the installation of an intercooler because his use for the truck would be mostly light-duty. Personally, I'd still want an intercooler because of the ~20-psi boost pressures and the heat load that creates, but the installation in that Canadian truck shows that a conversion can work without an intercooler in certain light-duty situations. It should be noted that running without an intercooler while towing heavy could produce dangerously high EGTs that put the engine at greater risk. Plus... the engine control module (ECM) monitors intake air temperature, in part to help protect the engine. Excessively high intake air temperatures will cause the vehicle's ECM to defuel the engine - reducing power. It's worth the trouble to install an intercooler, even if you don't plan to use the truck to tow.

    How is the intercooler mounted?... you might ask... The intercooler shown here is setting on 2 inch wide 3/16" thick rubber strips that had been glued onto the radiator core support using silicone caulking - to the horizontal and vertical surfaces where the intercooler core made contact. You can see small portions of the strips I'm talking about in the above image. The modified hood latch assembly then clamps the intercooler to the radiator core support - using rubber strips as cushioning. It's been a successful and solid mounting strategy for a long time... although, if my truck were driven on lots of rough road/off highway use, I'd consider welding some beefy 1/4" thick aluminum mounting tabs onto the intercooler core end-tanks that allow bolting it to the radiator core support using rubber-isolated hardware - along with the rubber cushioning strips mentioned here.

    There are always different ways to "skin a cat". You may have a different way of completing one of these projects. If nothing else, what's shown here is simply one way, albeit a successful way, that describes how I installed an intercooler in my truck. Project philosophy here in TDP always includes performance, reliability, cost, reproducibility and of course appearance - all important factors.

    Beyond the intercooler - there is another related conversion hurdle I faced soon after completing the intercooler installation, and I may show that solution here in a future update... the A/C condenser installation. I'm really happy with the modified A/C condenser I installed - it's solid, reliable, works great and looks professional. After the initial installation of the A/C system and R-134A charge, it's not needed any attention in the years since. Let me know if you'd like to see more. --- Jim


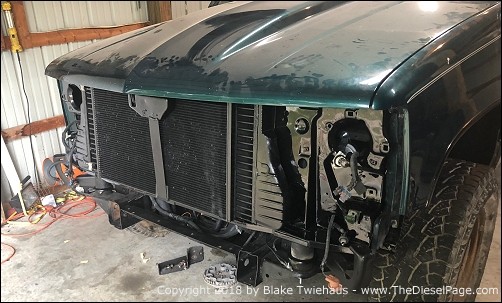
    On edit: The above image appeared in a article produced by The Diesel Page a while back, showing Blake Twiehaus's 1998 Chevy K1500 LBZ conversion. Blake used a Dodge Cummins intercooler like I did, but he chose not to widen the inlet/outlet. Instead, he modified the boxed sections of the radiator core support to accept the narrower-original width of the intercooler's inlet/outlet, while maintaining the radiator core support's structural integrity. Your can read more about Blake's conversion here: https://www.thedieselpage.com/duramax/1998LBZ.htm

    Did this forum thread or YouTube video help you with your conversion/swap? Would you like to share this information with others or help us get the word out about Duramax swaps? It's easy! Simply link to us in your own YouTube video, or post the link(s) shown here in a forum post, email message or social media site. Thank you!

    www.thedieselpageforums.com/tdpforum/showthread.php?35210
    https://youtu.be/--9bY1T3XoQ

    Thank you!
    Last edited by More Power; 12-10-2024 at 14:21. Reason: Make it the best!

Tags for this Thread

Posting Permissions

  • You may not post new threads
  • You may not post replies
  • You may not post attachments
  • You may not edit your posts
  •